The Glue Looper: A tool I will be reviewing soon.
Glue Delivery Strategies
Being careful and meticulous, almost surgical, with the way you deliver water thin CA to the workpiece is the key to a long and happy relationship with water thin superglue. If you aren’t careful you will create a mess that is very time consuming to clean up. First of all, Wax paper, teflon, and paste wax are 3 materials that CA will not adhere to. You can strategically use these materials to either protect certain areas or to funnel, or herd, the glue to where you want it to go. One example of this is placing a strip of teflon in a fret slot to repair chips right on the slot’s edge. Without the teflon dam, the CA glue would run right into the fret slot which would cause all sorts of problems.
The challenge with water thin CA is to deliver a single bead of glue to the appropriate location without dripping it somewhere else, without the glue running, and without accidentally delivering more CA than you intended. This is a lot bigger of a challenge than it may seem, especially if you have never used water thin CA before.
The nozzle on the bottle that the CA comes in is never fine enough. Attaching a wip tip funnels the glue to a very fine point and extends the reach of the nozzle. When I am using a wip tip, I keep a paper towel nearby, and before I deliver a bead of glue to the joint, I first turn the bottle over and let a bead drop onto the paper towel. This tells me that there isn’t any kind of obstruction in the bottle. The glue should flow out to the end of the wip tip like water and then a bead should form at the end. If there is an obstruction, I clear it with a paper clip. Now when I apply glue to the workpiece, I know what to expect from the nozzle. I shouldn’t have any surprises.
With water thin CA it is never necessary to squeeze the bottle. That is how you make a mess. Be patient and let gravity do the work. Sometimes even when you try your hardest to deliver just the right amount of glue, more comes out than necessary. I keep my paper towel handy to clean up the excess before it runs or cures. I don’t wipe with the paper towel because that would spread the glue out. Rather, I simply touch the excess bead of glue with the edge of the paper towel and the glue wicks right up into the paper towel.
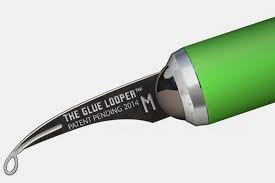
Another delivery strategy is to drop a bead of CA onto a finely tapered razor knife blade, and then place the tip of the razor blade where you want the glue to go. The bead should run out to the point of the razor blade and meet the workpiece at exactly where you wanted it to go. While this is a fine way to deliver CA glue, I recently purchased a new product that I am hoping will make the razor blade trick obsolete. It’s called the glue looper, and the second I saw a picture of it I knew what it was designed to do and I knew that I had to order it and give it a try. It is simply a razor knife blade specifically designed with delivering CA glue in mind. Instead of tapering to a point at the end, there is a metal loop that basically catches the droplet, and water tension won’t let the bead drop from the loop until it makes contact with the glue surface, which breaks the doplets tension. A picture of the product really says it all. As of this writing, I have not actually tried the glue looper yet, but I am excited to give it a try this week and I will review it in a later episode.
Non-structural Repairs
I just wanted to make an important point here that CA glue within the the context of guitarmaking is really only considered for non-structural applications. CA will never replace wood glues like titebond for structural applications. Use CA to glue a bridge down and you will find out real quick just how strong CA glue is, and then you will have to learn how to do a bridge re-glue as well!
So the non-structural repairs I am talking about are things like large gap fills around the binding, the end wedge, the neck joint, the rosette, etc…. but also sometimes a large chunk is taken off of an edge like the hard edge of the peghead. Patching in a similar piece of wood (or sometimes the exact missing piece if you were able to save it, in the case of a chunk taken off of an edge) is usually an easy task. I save some of my scrap from a project until the project is complete. That way I can always find a piece of scrap wood with the right grain and color to seamlessly hide a large gap. In most cases, I can hold my scrap piece in a nut slotting vise and carefully shape it with a needle file until it fits just right. Then I can press the filler piece into the gap and hold it with either a razor knife or a paper clip or some other extended object that allows me to hold pressure on the piece without gluing my fingertip to the guitar in the process.
Dust Fills
Very small gaps can be filled with wood dust and then CA glue can be dropped over the fill to percolate down through the wood dust. Be careful with your judgement of what is considered a small gap and what is considered a large gap. A dust fill on a small gap can become invisible, whereas a dust fill on a large gap can be a real eye sore. The color of wood dust never quite matches the color of the wood that the dust came from, except in the case of ebony. And this becomes even more apparent on a large gap because the dust fill lacks grain lines. In fact, with a dust fill I am rarely trying to conceal a gap amongst the surrounding wood. Rather, I try to blend gaps in with the grain lines if I can. It is much easier, because dark dust fills work so much better than light dust fills. For this reason I almost exclusively use ebony dust to conceal gaps. The ebony dust fill hides itself as just another grain line in the surrounding wood.
It’s important to brush the dust into the gap loosely and to not attempt to pack the dust in with your fingernail. The CA glue percolates throughout the entire fill if the dust is packed loosely.
Nut Slot fills
So you just slotted a nut and the D string is buzzing. Oops! Looks like you cut the D string too low. There’s a quick fix for this that saves you from having to start over with a new nut.
Pack the D string slot with baking soda and apply a drop of CA glue. Before I do this, I place a piece of tape at the leading edge of the slot as a dam to keep the glue and the baking soda from spilling out onto the leading face of the nut. This baking soda/CA glue mixture blends in with the surrounding bone and hardens to a pretty similar hardness. The D string slot can now be recut.
Gluing Frets
I like to glue my frets in for a little added security. Many builders don’t bother with this. I like to use water thin CA to glue the frets in because I can wick the glue in after the frets are installed, by placing a bead on the tang where it exits the slot and letting the glue travel down the tang.. You have to be very careful with this as delivering too much glue to the tang of the fret causes the glue to wick out from under the fret and onto the show face of the fretboard, leaving what looks like a shadow along the edge of every fret. This shadow can be removed later with some carefully applied acetone, 0000 steel wool, and a lot of elbow grease, but it’s better to just avoid it in the first place. If you’re not partial to any specific fretwire size, then using wide fretwire instead of narrow fretwire, can prevent the “shadows” from showing.
Sealing Grain
It should be noted that CA glue seals wood grain. This can be used to our benefit. I like to wick CA glue down into the wood insert holes for the neck bolts on my bolt on necks. The purpose of this is not to hold the wood inserts in place. Remember, CA glue is not structural. The threads of the wood inserts are enough to hold it in place as long as the hole is properly sized. The CA glue is wicked down into the hole simply to seal the exposed endgrain, which otherwise might expand or contract later potentially loosening the threaded inserts.
Cleaning up the Mess
The best way to clean up a nasty CA glue mess is not to create one in the first place! But if you do have to clean up gobs of glue some of these tips can help.
- Use a Q-tip dipped in acetone and careful target the glue stains. As mentioned before, acetone softens CA somewhat. It still takes a bit of elbow grease to remove it completely, but the acetone certainly helps. Make sure you keep the acetone away from any plastic parts like the bindings or from areas where you don’t want a glue joint to come undone.
- If a glue gob sits proud of the surrounding surface, make sure you target just the glue and not the surrounding wood. CA is much harder than wood and sanding the glue gob flush with a large flat sanding block may seem like a good idea, however, it tends to sand the surrounding wood more than the glue itself, creating a depression around the glue gob.
- A chisel in a careful hand works best for this, but a razor blade sharpened into a miniscraper works well too. Tape off the edges of the chisel or razor blade so that the only exposed part of the blade is the exact size of the gob in question. That way, you can target the glue gob without scraping the surrounding wood as well.
- Another way to target just the glue gob is to use a sanding stick held upside down so that the rounded side of the sanding stick is utilized rather than the beveled end.
- Once the glue gob or stain is flush or close to flush it is best to switch to sanding or scraping a very broad area around the stain, rather than targeting the stain. OItherwise, you’re digging a depression again.
- The best way to clean up “shadows” around the frets is to first carefully drop some acetone on the shadow and then press 0000 steel wool up against the corner where fretboard meets fret with your thumbnail and rub along the length of the fret.
Want more of this? Subscribe below for Weekly Guitar Making Tips on “The Small Shop Luthier Blog”
Want to really learn more!? Take a class with Eric Schaefer and build your own guitar in 8 days!

Or Join The Online Guitar Building School